Master Easy Homemade Soft Pretzels: Ditch Store-Bought Forever
Imagine sinking your teeth into a warm, pillowy-soft pretzel, still slightly steaming from the oven, with a glistening, golden-brown crust and perfectly coarse salt crystals clinging to its surface. Now, imagine that perfection coming straight from *your* kitchen, crafted with your own hands. This isn't a fantasy; it's the reality of mastering a simple soft pretzel recipe that will forever change your snacking habits. Once you experience the unparalleled taste and satisfaction of homemade, those bland, often stale store-bought versions will become a distant memory.
Making soft pretzels at home is not only incredibly fun but also surprisingly easy. Forget the misconception that baking bread-like items is complicated. With the right guidance, a batch of these chewy delights can be yours in no time, tasting infinitely better and costing a fraction of what you'd spend buying them individually. Just like baking your own dinner rolls or a fresh loaf of white bread, the flavor, texture, and sheer joy of creating these yourself simply cannot be matched.
Why Homemade Soft Pretzels Will Change Your Snacking Game
There's a world of difference between a mass-produced, often preservative-laden snack and one crafted with fresh, wholesome ingredients in your own kitchen. When you whip up a batch of homemade soft pretzels, you're not just making food; you're creating an experience. Here’s why diving into this soft pretzel recipe is an absolute game-changer:
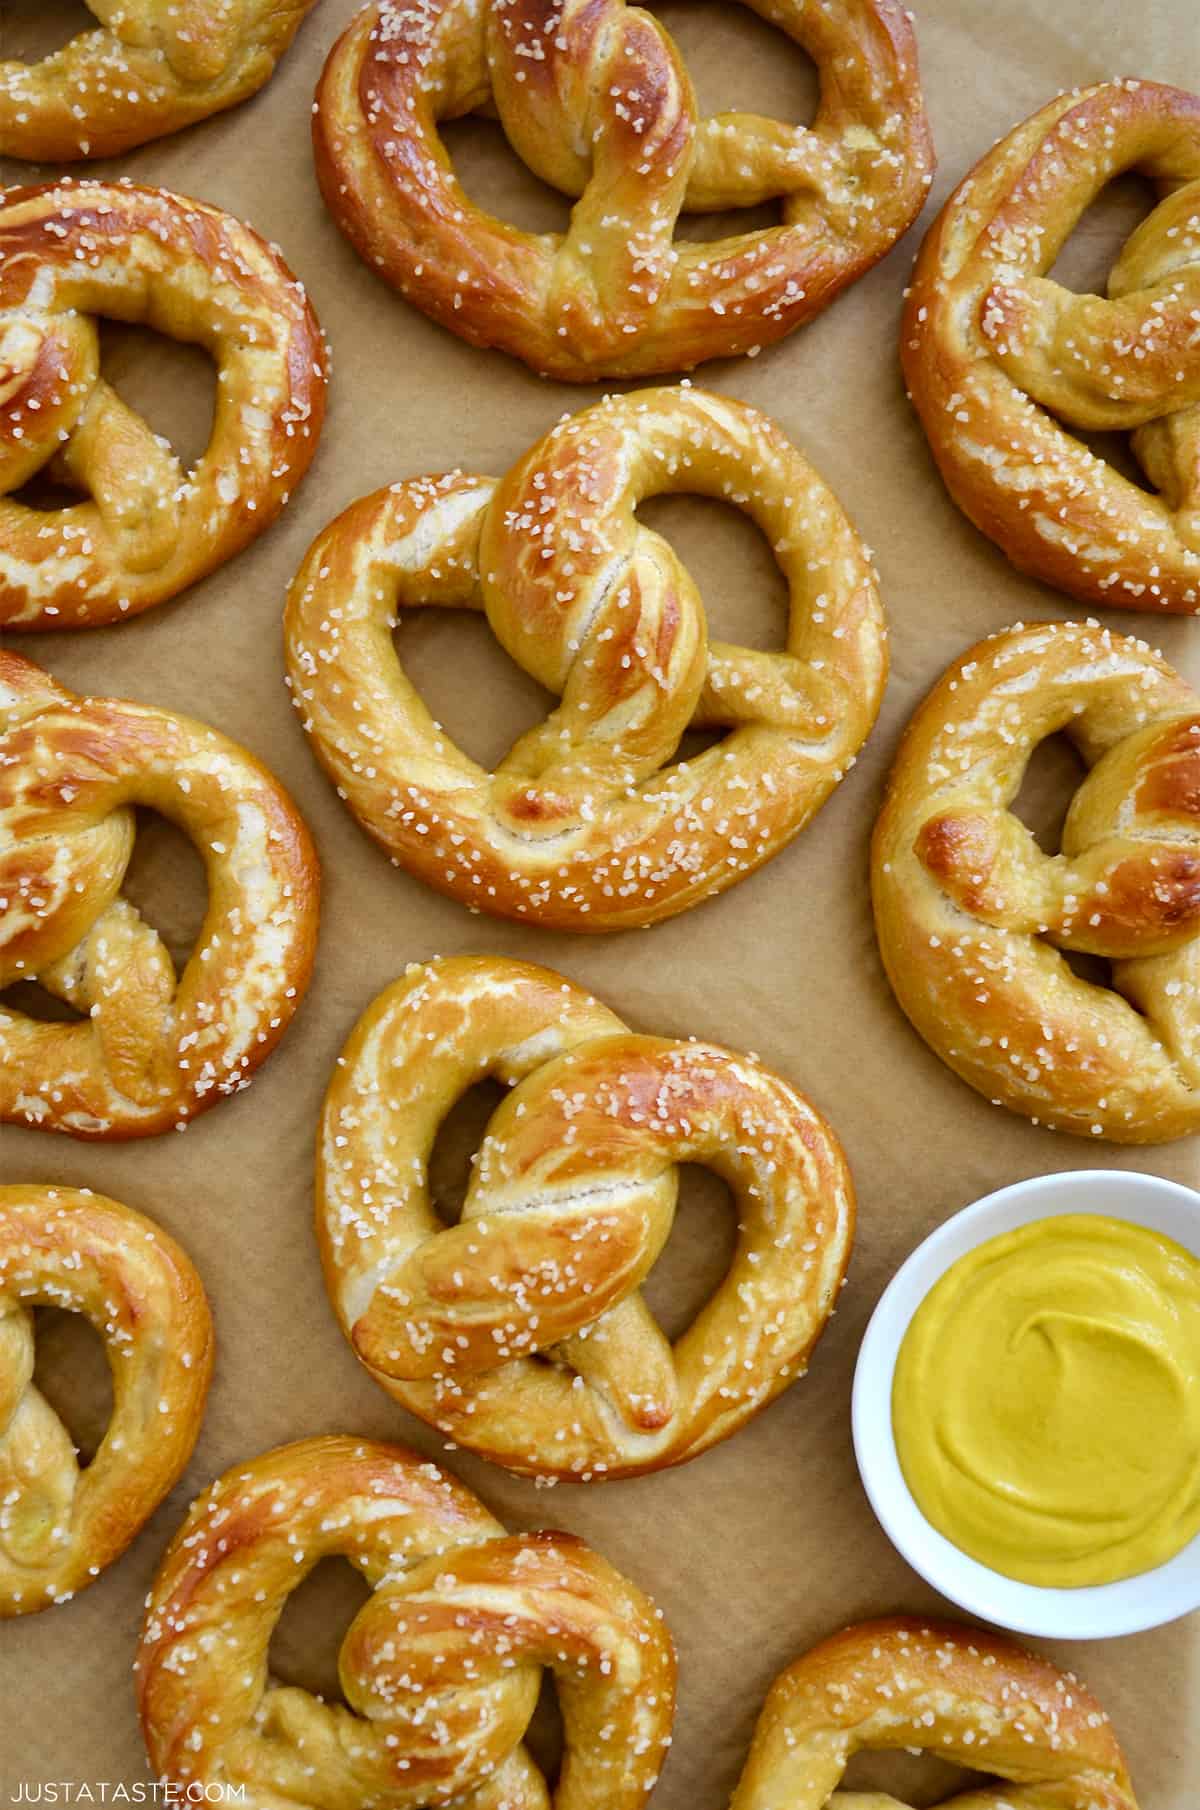
- Unmatched Flavor and Texture: Homemade pretzels boast a tenderness and chewiness on the inside that store-bought versions rarely achieve. The crust is perfectly crisp and golden, a stark contrast to the often rubbery or dry texture of pre-packaged options. They come out of the oven warm, aromatic, and irresistible – a sensory delight that makes it impossible to stop at just one.
- Cost-Effectiveness: Think about the price of a single pretzel at a mall or specialty store. Now, consider that you can make an entire tray of these delectable treats for just a few dollars, using basic pantry staples. It’s an incredibly budget-friendly way to enjoy a gourmet-quality snack.
- Wholesome Ingredients: With homemade, you control exactly what goes into your food. No artificial flavors, colors, or unnecessary preservatives. Just simple ingredients like flour, water, yeast, salt, and butter. This transparency gives you peace of mind and ensures a healthier snack for you and your family.
- The Joy of Baking: There's immense satisfaction in creating something delicious from scratch. The process itself—mixing the dough, watching the yeast activate, shaping the pretzels, and seeing them transform in the oven—is a rewarding experience. It’s a fantastic activity to share with family, creating cherished memories alongside delicious treats. My family and I can attest, they simply can't stop snacking on them once they're out of the oven!
The Secret Behind That Perfect Pretzel: Science & Tradition
The iconic soft pretzel, with its distinctive golden-brown hue and delightfully chewy crust, isn't just a happy accident. Its perfection is rooted in centuries-old tradition, originating in Germany (hence why they're often called German soft pretzels), combined with clever culinary science. Two key steps are crucial to achieving that signature pretzel experience:
- The Alkaline Water Bath: This is the most crucial step that separates a true soft pretzel from just another piece of bread. Before baking, the shaped pretzel dough is briefly submerged in a simmering bath of water enhanced with baking soda. This alkaline solution does several things:
- Jumpstarts Browning: The high pH of the water rapidly breaks down proteins and starches on the pretzel's surface, accelerating the Maillard reaction during baking. This reaction is responsible for the deep golden-brown color and complex, savory flavors.
- Creates the Chewy Crust: The baking soda bath gelatinizes the starches on the dough's exterior, forming a barrier that prevents excessive rise and contributes to the characteristic chewy, slightly dense crust. This is precisely what gives pretzels their unique texture, distinct from other bread products. To delve deeper into this fascinating process, be sure to read our article on Unlock Chewy Golden Soft Pretzels: The Alkaline Bath Secret.
- The Egg Wash: Just before the pretzels hit the hot oven, they receive a generous brush of egg wash (typically an egg yolk whisked with a little cold water). This step isn't just for aesthetics; it plays a vital role in developing that irresistible finish:
- Enhanced Shine: The egg proteins create a beautiful, glossy sheen on the baked pretzels, making them even more visually appealing.
- Deeper Color: Like the alkaline bath, the egg wash further promotes browning, contributing to that rich, deep golden-brown color we all associate with perfect soft pretzels. It's a technique often used in high-end baking, similar to how a beef Wellington gets its luxurious finish.
Essential Ingredients for Your Authentic Soft Pretzel Recipe
One of the beauties of this soft pretzel recipe is that it relies on basic, everyday ingredients you likely already have in your pantry. Using these foundational components ensures an authentic and incredibly flavorful result. Here's a closer look at what you'll need and why each ingredient is important:
- Brown Sugar: This isn't just for sweetness (though it does add a subtle, pleasant hint). Brown sugar acts as vital food for the yeast, helping it activate and thrive. The molasses in brown sugar also contributes to a slightly richer flavor profile compared to white sugar.
- Warm Water: Crucial for activating the yeast. The ideal temperature range is typically between 105-115°F (40-46°C). Water that's too hot will kill the yeast, while water that's too cold won't allow it to activate properly, leading to dense pretzels.
- Yeast: The magical leavening agent that gives pretzels their rise and signature soft, fluffy interior texture. You can use either active dry yeast or instant rise yeast (also known as quick rise yeast). While both work, instant rise yeast often offers a slightly quicker and more consistent rise, as it doesn't require a separate proofing step if mixed directly with the dry ingredients. However, for this recipe, we'll activate it first to ensure its potency.
- Unsalted Butter: Melted butter is incorporated directly into the dough, adding richness, depth of flavor, and contributing to the tender crumb. Using unsalted butter allows you to control the exact amount of salt in your recipe.
- Sea Salt: Essential for seasoning the dough itself, balancing the subtle sweetness and enhancing all the other flavors. Coarse sea salt or pretzel salt is then sprinkled generously on top of the pretzels before baking, providing that iconic salty crunch.
- All-Purpose Flour: The fundamental base of your pretzel dough, providing structure and body. Accurate measurement is key here – too much flour can lead to dry, tough pretzels, while too little will result in a sticky, unmanageable dough.
- Baking Soda: The star ingredient for your alkaline water bath. It's what gives the pretzels their distinctive chewy crust and helps achieve that deep golden-brown color. Ensure you use enough to make the bath adequately alkaline.
- Egg Yolk with Cold Water (Egg Wash): Whisked together, this creates the perfect egg wash. It’s painted onto the pretzels just before baking to give them that beautiful, glossy, deep golden finish. A whole egg or egg white with water can also be used, but the yolk provides the most vibrant color and sheen.
Step-by-Step Guide to Crafting Your Perfect Soft Pretzels
With your ingredients ready, let's walk through the simple yet rewarding process of making your own soft pretzels. A stand mixer with a dough hook makes this process a breeze, but it can absolutely be done by hand with a little elbow grease!
- Activate the Yeast: In the bowl of your stand mixer, combine the warm water, brown sugar, and yeast. Give it a gentle whisk until everything is well combined. Let this mixture sit undisturbed for about 5 to 7 minutes. You're looking for a foamy "raft" to form on the surface – this indicates that your yeast is alive, active, and ready to get to work. If no foam appears, your yeast might be expired or the water temperature was off, and it's best to start again.
- Build the Dough: Once the yeast is bubbly and active, attach the dough hook to your mixer. On low speed, slowly incorporate the melted unsalted butter and sea salt. Then, gradually add the all-purpose flour, one cup at a time, allowing each addition to mix in gently before adding the next. This controlled addition helps prevent a flour cloud and ensures even incorporation.
- Knead to Perfection: Once all the flour is added and a shaggy dough has formed, increase the mixer speed to medium-low. Allow the machine to knead the dough for about 5-7 minutes. You're looking for a smooth, elastic dough that pulls away from the sides of the bowl. If kneading by hand, turn the dough out onto a lightly floured surface and knead vigorously until it's smooth and supple.
- First Rise: Lightly grease a clean bowl with a little oil. Place the dough in the bowl, turning it once to coat. Cover the bowl tightly with plastic wrap or a clean kitchen towel. Let the dough rise in a warm, draft-free place for about 45-60 minutes, or until it has roughly doubled in size.
- Shape Your Pretzels: Once risen, gently punch down the dough to release the air. Divide the dough into 8 equal pieces. Roll each piece into a long rope, about 20-24 inches in length and about ¾ inch thick, tapering the ends slightly. To create the classic pretzel shape, form a "U" shape with the rope, then cross the ends over each other twice. Bring the twisted ends down and press them firmly onto the bottom curve of the "U" to seal. Place the shaped pretzels on a parchment-lined baking sheet.
- The Alkaline Bath: While the oven preheats to 450°F (230°C), bring a large, wide pot of water to a rolling boil. Carefully stir in the baking soda until dissolved. Gently drop the shaped pretzels, one or two at a time, into the boiling alkaline water. Let them simmer for about 30 seconds per side, or a total of 1 minute. Using a slotted spoon or spatula, carefully remove the pretzels, allowing excess water to drain, and return them to the parchment-lined baking sheet.
- Egg Wash & Salt: Whisk together the egg yolk and cold water to create your egg wash. Generously brush each pretzel with the egg wash, ensuring full coverage. Immediately sprinkle with coarse sea salt or pretzel salt.
- Bake Until Golden: Transfer the baking sheet to the preheated oven. Bake for 12-15 minutes, or until the pretzels are beautifully puffed up and deep golden brown. The exact time may vary slightly depending on your oven, so keep an eye on them.
Tips for Pretzel Perfection: Beyond the Basics
To ensure your homemade soft pretzels are always a triumph, consider these additional insights and tips:
- Don't Rush the Rise: While instant yeast is fast, allowing your dough to complete its first rise fully develops flavor and texture. A warm spot, like a slightly warmed oven (then turned off) or near a sunny window, can speed things up.
- Experiment with Toppings: While classic coarse salt is king, don't be afraid to experiment! Try everything bagel seasoning, garlic powder and Parmesan, or for a sweet twist, brush with melted butter after baking and sprinkle with cinnamon sugar.
- Serving Suggestions: Soft pretzels are fantastic on their own, but they're even better with dips! Classic options include tangy mustard (dijon or spicy brown), warm cheese sauce, or even a sweet cream cheese dip for dessert pretzels.
- Storage and Reheating: Homemade soft pretzels are best enjoyed fresh from the oven. If you have leftovers, store them in an airtight container at room temperature for up to 2 days. To reheat, a quick blast in the microwave (15-20 seconds) or a few minutes in a toaster oven will bring back their warmth and some tenderness.
- Troubleshooting Sticky Dough: If your dough is too sticky after kneading, add a tablespoon of flour at a time until it's manageable. If it's too dry and crumbly, add a teaspoon of warm water until it comes together. Humidity and flour brand can affect consistency.
There you have it – the comprehensive guide to mastering the easy homemade soft pretzel recipe. You now possess all the knowledge and inspiration to ditch those disappointing store-bought versions forever. The satisfaction of pulling a tray of warm, fragrant, perfectly golden and chewy soft pretzels from your own oven is an unparalleled reward. So, gather your ingredients, clear your counter, and get ready to transform your snacking game. Your taste buds (and your family) will thank you!
